One of my little luxuries is burning candles.
I love the soft light they give off and how cosy they are. I have an open fire, and when that’s lit they make the room into a total den of cosiness. When I can’t be bothered with the faff of cleaning the grate, or it’s too warm for an open fire, candles are perfect for adding atmosphere.
Recently I started buying beeswax candles. I’d read a lot about the paraffin wax used in regular candles being bad for you. They release chemicals and soot into the air, essentially creating air pollution in your home. Unless you are solely lighting your home with candles, it’s unlikely that it’s going to be the thing that eventually kills you. However, I have another risk factor, as I am asthmatic. Asthmatics are particularly sensitive to the effects of air pollution and are at greater risk of problems from burning paraffin wax candles. So, quite sensibly, I switched to buying beeswax tealights.
The problem is that beeswax tealights cost around 50p+ each, compared to being able to pick up regular tealights for under 10p each. Beeswax candles to burn for longer, but it can still work out pretty expensive, so I decided to have a go at making my own.
Mr Chick has frequently melted together the old ends of candles to make shiny new ones, but I had never tried it before. I read a few online tutorials, and they all basically said the same thing. Some suggested mixing the beeswax with coconut oil, but this seemed like an unnecessary step (and expense), also, the idea was to have as little added ingredients to burn as possible, so I skipped it. It doesn’t seem to have made a difference to my finished candles.
Beeswax is prone to not melting fully and only burning down the centre, leaving a ring of wax around the outside of your container. Adding Coconut oil is supposed to stop that happening. I mostly used small containers to turn into candles, which means this is less of a problem. It also helps if you make sure that when you first burn the candle you leave it burning for quite a while, a few hours at least, until the whole top of the candle is melted. If the candles do burn unevenly and there is a lot of left over wax around the sides then it is very easy to remelt it and turn it into new candles.

The next thing I needed was some containers to make the candles in. Sitting around my house I have a LOT of vintage glasses and crockery that would be perfect for holding candles. I never drink out of a lot of them, so they’re essentially just clutter that I can’t bear to get rid of.
I used some 50s Atomic printed shot glasses and some small stemmed sherry glasses. It is possible to also use vintage tea cups. Personally I think tea cups are a bit big for candles, they are more likely to burn down the centre and drown the wick before it hits the bottom. Vintage coffee or espresso cups, however, are slightly smaller, and I happened to have a few that weren’t really in a state to be used again so they have now also been pressed into service as candle containers!

You can also refill old tealight cases if you want something that will fit in your existing tealight holders.
The candles are actually really simple to make, so despite my laziness I will definitely be doing it again!
You will need:
Beeswax pastilles – I bought 1lb of beeswax pastilles from Amazon and it made all the candles you see in the picture. It comes in a cosmetic grade, as well as the cheaper grade suitable for candles
Candle wicks – I bought 100 wicks made from natural cotton, containing no lead or other nasties that can lurk in candle wicks. These wicks came with stickers to attach them to the bottom of the jar, but you could attach them with double-sided tape, or a glue gun.
Tooth picks or wooden skewers – Depending on the size of your glass, these are to stablise the wicks while the candles set.
Containers for your candles – I used vintage glasses, you could use mason jars, tea cups, old tea light cases (or buy new ones). Whatever works for you.
A large jam jar or bowl and a saucepan – This is for melting the wax.

The first thing to do is prepare your containers.
Make sure they are dust free, then use the wick stickers to stick the metal part of the wick to the bottom of the container. If you’re using small containers you can cut the stickers in half, or even into quarters. They’re just to stop the wick floating away when you add wax.
The next bit is the fiddly bit. you want to wrap the wick around a skewer or tooth pick to keep it central in the container. I recommend trimming the wick down a little first, the rolling the top of the wick around the toothpick and rolling it down till it sits on the rim. Don’t pull too hard or you’ll pull the wick loose from the container.
If you’re a bit more practised you can prepare your containers while the wax is melting, but I didn’t want to be faffing about rolling wicks and risk having the wax go blobby and burst into flames while it was unattended!

Next you want to melt your wax.
Fill a saucepan with water and bring it to a simmer (you can also just use boiled water from the kettle and put it over a low heat till it is simmering).
Fill your large jam jar with wax pastilles and place it in the pan of water. You can use a large glass bowl for this if you want, however wax is a nightmare to get off of everything, so I don’t recommend using your best mixing bowl.
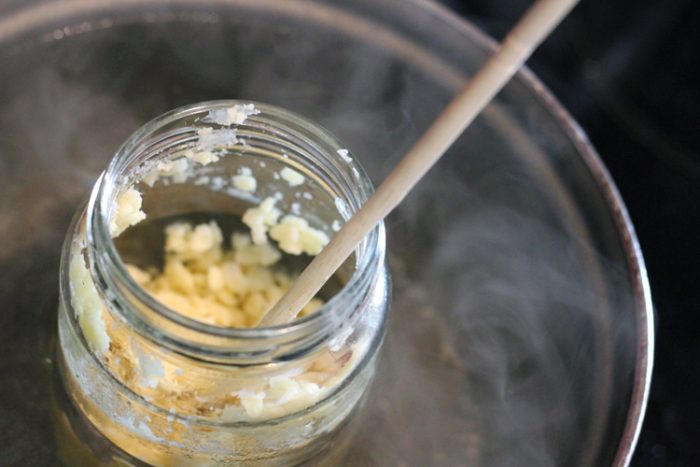
I found the wax took about 5 to 10 minutes to melt. Keep stirring it, I used an old chopstick that I didn’t mind getting covered with wax. Be patient and keep stirring. Eventually all the little blobs of wax will melt.
Then you just need to pour your wax into your containers.
TIP:Â Make sure you use a tea towel to pick up the jam jar, it will be hot!
The volume of the wax pastilles will decrease as they melt down. If you fill your jam jar, you’ll have about half a jam jar at the end. I did my candles in several batches rather than trying to melt all the wax at once. That meant I wasn’t trying to handle large quantities of hot wax, and that it melted quicker in smaller amounts.
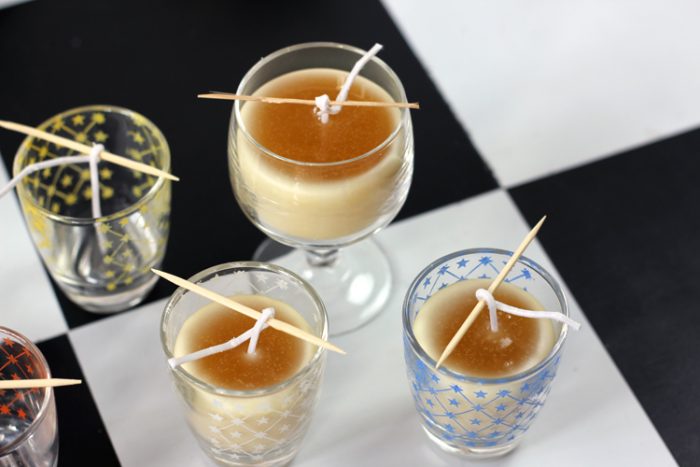
Leave the candles to set, then remove the tooth picks and trim the wicks to about a centimetre above the surface of the candle.
As the candle sets you might find the top sinks a little. I don’t really mind how this looks, but if you want to try and get a flat top to your candle you can then pour another layer of wax over the top.
Leave the candles to fully set before burning them. Most places recommend 2 days. I’m pretty impatient, so mine made it 12 hours before first burning and they seemed fine. Again, the size of the container you use will affect how quickly your candles are fully set.
And, that is how you make 100% Beeswax candles out of vintage glasses!
7 comments for “How to Make Candles from Vintage Glasses”